前回は、単純にOutSystemsのWeb Blockに地図を表示し、クリックした位置にマーカーを立てるまでをやりました。
それだけだとほぼただの飾りで、ホームページの案内図くらいにしか使えないませんね。
そこで、OutSystemのEntityに長方形の座標を持たせ、Google Maps上に表示させるとともに、ユーザが長方形を書けるようにします。
Table of Contents
シリーズ一覧
- OutSystems+Google Maps API(1) 地図を埋め込む
- OutSystems+Google Maps API(2) OutSystensのEntityと地図上の長方形を紐づけ
- OutSystems+Google Maps API(3) Entityの一覧画面でも地図を表示する
前提条件
前回分の修正を施したモジュールが手元にあるのが前提。
「OutSystems+Google Maps API(1) 地図を埋め込む」を参照してください。
仕様
実現する機能:
- OutSystemsのEntityとして、支店(Branch)Entityを作成(店の位置を示す座標値を持つ)
- 支店Entityの詳細画面(BranchDetail)を作成(地図を配置する)
- 地図を表示する際に支店Entityが座標値を持っていれば、長方形を描画する
- 新規/更新の際は、地図をクリックして長方形を描画でき、支店Entityに座標を保存できる
実装:Entity
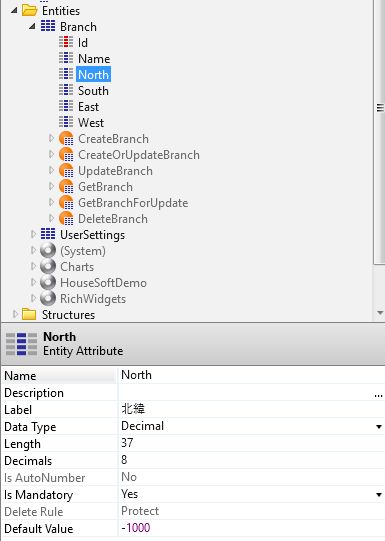
Entity名:Branch
属性:North(長方形北側の緯度)、South(長方形南側の緯度)、East(長方形東側の経度)、West(長方形西側の経度)
この4つの属性で表せる長方形を描画します。きれいな形の長方形だけを書くようにします。こうすれば、(疑似的にですが)数値の範囲検索で点が長方形に入っているかどうかを検索できるので。
本当に空間的な位置で含まれているかどうかを検索しようと思うと、RDBの空間DBの機能を使うか、ArcGISみたいなGISが必要です。
OutSystemsがNULL値の代わりに0を数値項目で使ってしまうので、おそらく緯度・経度として使うことがない-1000を未入力の代わりに使うことにしています(Default Value)。
実装:Web Screen
前回つくったScreenに比べて座標値を入力するテキストボックス4つを追加しています。
Branch Entityの座標値を表示するとともに、入力した座標値をEntityに引き渡す役割です。
EntityのNorthなどのAttribute4つを選択して、Nameの下にドロップすればOutSystemsがうまく配置してくれます。
配置しているWeb Blockを後で修正して、この座標テキストボックスにJavaScriptで値を設定するようにしますので、テキストボックスのプロパティを下記のように設定しておきます。
- Name:適当な名前。ここではBranch_Northとかにしておきました。Branch_North.Idとすればhtml上でのIDを取得できます。
- Enabled:False。ユーザが自由に入力できると変な値が入ってしまうかもしれないので入力は禁止。
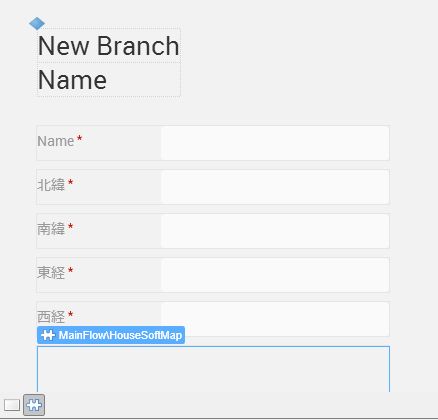
この後でWeb Blockにパラメータを追加したら配置先のScreenでも、配置したWeb Blockのプロパティ4つにテキストボックスのIDを設定してください。
実装:Web Block(パラメータ)
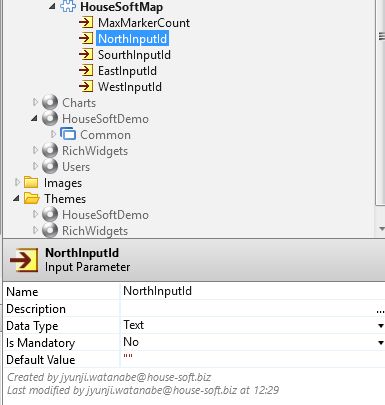
まずは、Web Screenで配置したテキストボックスのId値を受け取る入力パラメータを作っておきます。
編集画面でないならこのパラメータは不要なので、デフォルト値を空文字列にします。未指定のときはテキストボックス関連の処理を行わないようにすれば、編集する画面としない画面両方で配置できるでしょう、
パラメータを追加したので、Web Block内に配置したExpressionのJavaScriptコード(インスタンス化処理)のパラメータを変更します。
"<script type='text/javascript'>
  function initMap() {
    houseSoftMap.createMap('" + Map.Id + "', " + MaxMarkerCount + ", '" + NorthInputId + "', '" +
                           SourthInputId + "', '" + EastInputId + "', '" + WestInputId + "');
  }
</script>
<script src='https://maps.googleapis.com/maps/api/js?key=" + Site.APIKey + "&callback=initMap' async defer></script>
"
実装:Web Block(長方形を描画させ、結果を保存できる)
Web BlockのJavaScriptプロパティの値に以下処理を追加。
まずは、クリックしてマーカーを追加する関数ですが、クリックした回数が2回以上のとき、直近2回分の座標から長方形を書きます。
ここでは、座標をとって長方形の座標(北、南、東、西)を返す関数(getRectangleFrom2Points)を呼びその結果をaddRectangleで地図上に描画。
addMarker : function(marker) {
      this.markers.push(marker);
      // 直近のMaxMarkerCountポイントだけ持つ
      while (this.markers.length > this.maxMarkerCount) {
        var firstMarker = this.markers.shift();
        firstMarker.setMap(null); // マーカーを地図から削除
      }
      var markerLength = this.markers.length;
      if (markerLength >= 2) {
        // 直近2点をとってそれぞれ対角線に取る長方形の緯度・経度を算出して地図に描画
        var point1 = this.markers[markerLength - 1].getPosition();
        var point2 = this.markers[markerLength - 2].getPosition();
        var rectangle = this.getRectangleFrom2Points(point1, point2);
        this.addRectangle(rectangle);
      }
  }
2点から長方形の座標を計算する関数の実装です。2点の緯度を比較して大きい方が北、小さい方が南という計算をしているだけ。
途中で読んでいるsetRectangleInputでScreenからテキストボックスのIDをもらっていたらそのテキストボックスに値を設定しておきます。
こうしておけば、詳細画面で保存されたとき、自動的にOutSystemsのEntityに反映されるはず。
getRectangleFrom2Points : function(point1, point2) {
var north, south, west, east;
if (point1.lat() < point2.lat())
{
north = point2.lat();
south = point1.lat();
}
else
{
north = point1.lat();
south = point2.lat();
}
if (point1.lng() < point2.lng())
{
east = point2.lng();
west = point1.lng();
}
else
{
east = point1.lng();
west = point2.lng();
}
// 今作った長方形の座標を(指定されていれば)Web Screenの部品にセットする
this.setRectangleInput(north, south, east, west);
return {
north: north,
south: south,
east: east,
west: west
};
},
setRectangleInput : function(north, south, east, west) {
if (this.northInputId && this.southInputId && this.eastInputId && this.westInputId)
{
document.getElementById(this.northInputId).value = north;
document.getElementById(this.southInputId).value = south;
document.getElementById(this.eastInputId).value = east;
document.getElementById(this.westInputId).value = west;
}
}
最後に長方形描画の関数です。後で一覧画面も作るのでそれに備えて長方形はrectanglesという配列型のプロパティに保存しています。
今回は地図上に長方形は一つでいいため、毎回長方形描画前に以前の長方形は削除。
  addRectangle : function(rectangle) {
    // 追加済みの長方形はクリアする
    while (this.rectangles.length > 0) {
      var temp = this.rectangles.shift();
      temp.setMap(null);
    }
    var rectangle = new google.maps.Rectangle({
      strokeColor: '#FF0000',
      strokeOpacity: 0.8,
      strokeWeight: 2,
      fillColor: '#FF0000',
      fillOpacity: 0.35,
      map: this.mapObj,
      bounds: rectangle
    });
    this.rectangles.push(rectangle);
  }
Web BlockのjavaScriptの完全版
var houseSoftMap = {
mapObj : null,
maxMarkerCount : 0, // 地図に表示するマーカーの数。デフォルトではマーカー追加できないようにしておく
markers : [],
rectangles : [], // 地図上に表示している長方形を保持。一覧画面への適用を考慮して配列
northInputId : null,
southInputId : null,
eastInputId : null,
westInputId : null,
createMap : function (divId, maxMarkerCount, northInputId,
southInputId, eastInputId, westInputId) {
this.mapObj = new google.maps.Map(document.getElementById(divId), {
center: {lat: -34.397, lng: 150.644},
zoom: 8
});
this.maxMarkerCount = maxMarkerCount;
this.setRectangleInputIds(northInputId, southInputId, eastInputId, westInputId);
this.mapObj.addListener("click", function(mouseEvent) {
if (houseSoftMap.maxMarkerCount <= 0) return; // クリックした位置にマーカーを立てる var marker = new google.maps.Marker({ position: mouseEvent.latLng, map: houseSoftMap.mapObj }); houseSoftMap.addMarker(marker); }); }, setRectangleInputIds(northInputId, southInputId, eastInputId, westInputId) { // 地図で描いた長方形の座標を受け取る部品があれば覚えておく this.northInputId = northInputId; this.southInputId = southInputId; this.eastInputId = eastInputId ; this.westInputId = westInputId ; if (this.northInputId && this.southInputId && this.eastInputId && this.westInputId) { var north = parseFloat(document.getElementById(this.northInputId).value); var south = parseFloat(document.getElementById(this.southInputId).value); var east = parseFloat(document.getElementById(this.eastInputId).value); var west = parseFloat(document.getElementById(this.westInputId).value); if (north >= -180 || south >= -180 || east >= -180 || west >= -180)
{
this.addRectangle({
north: north,
south: south,
east: east,
west: west
});
}
}
},
addMarker : function(marker) {
this.markers.push(marker);
// 直近のMaxMarkerCountポイントだけ持つ
while (this.markers.length > this.maxMarkerCount) {
var firstMarker = this.markers.shift();
firstMarker.setMap(null); // マーカーを地図から削除
}
var markerLength = this.markers.length;
if (markerLength >= 2) {
// 直近2点をとってそれぞれ対角線に取る長方形の緯度・経度を算出して地図に描画
var point1 = this.markers[markerLength - 1].getPosition();
var point2 = this.markers[markerLength - 2].getPosition();
var rectangle = this.getRectangleFrom2Points(point1, point2);
this.addRectangle(rectangle);
}
},
getRectangleFrom2Points : function(point1, point2) {
var north, south, west, east;
if (point1.lat() < point2.lat())
{
north = point2.lat();
south = point1.lat();
}
else
{
north = point1.lat();
south = point2.lat();
}
if (point1.lng() < point2.lng()) { east = point2.lng(); west = point1.lng(); } else { east = point1.lng(); west = point2.lng(); } // 今作った長方形の座標を(指定されていれば)Web Screenの部品にセットする this.setRectangleInput(north, south, east, west); return { north: north, south: south, east: east, west: west }; }, setRectangleInput : function(north, south, east, west) { if (this.northInputId && this.southInputId && this.eastInputId && this.westInputId) { document.getElementById(this.northInputId).value = north; document.getElementById(this.southInputId).value = south; document.getElementById(this.eastInputId).value = east; document.getElementById(this.westInputId).value = west; } }, addRectangle : function(rectangle) { // 追加済みの長方形はクリアする while (this.rectangles.length > 0) {
var temp = this.rectangles.shift();
temp.setMap(null);
}
var rectangle = new google.maps.Rectangle({
strokeColor: '#FF0000',
strokeOpacity: 0.8,
strokeWeight: 2,
fillColor: '#FF0000',
fillOpacity: 0.35,
map: this.mapObj,
bounds: rectangle
});
this.rectangles.push(rectangle);
}
}
実装完了
ここまでで、
- 詳細画面を既存Entityを開くと長方形を地図上に描画した状態で開く
- 新規・既存どちらでもユーザが地図上をクリックしていくと直近2点で長方形が描画され、結果はOutSystemsのEntityに保存される
ようになりました。